Tuesday, October 2, 2012

A New Challenge, A New Chapter!

Today I did it.  I couldn't help myself!


I've been looking through different companies for opportunities.  I wanted a company that I could be flexible and go to my sons ball games, but yet make a little cash, dough, moolah--MONEY!!!!!  AND have FUN!!!!  So, after researching and researching and reading conracts and terms and conditions, (boring, boring, boring) I did it.  I am now officially a Close to my Heart consultant! 

So, if anyone needs any stamps or papers, ideas, workshops or would just like to get together to craft--SEE ME!!!!!  It can be just you or a group of friends.  We'll have a blast! (I'll even bring cupcakes!)


Here is my blog.  It will take you to my Facebook page and my online CTMH store:
http://craftyqueenswithctmh.blogspot.com/

Please come see me at that blogspot as well (though I might merge RRW and Crafty Queens-more to come later).  I'll have lots of new items I'll be creating and entering into contests from the Crafty Queens blog as well!

Take Care!

Ren'ee

Friday, September 28, 2012

Lets go NUTTY!!

Time is just flying this year.  It seems it's turned from hot days to cool days simply overnight.  I'm not sure what happened to the September weather.  It feels more like October.  So I feel like decorating for fall.  The leaves are starting to turn burgandy in color.  If they feel like a change, then so do I!  Besides, fall is one of my favorite times of year--with all the apples, honey and bees, leaves changing and the little campfires outside.  Not to mention the last outdoor get together of the year--where everyone needs a coat, roasts hot dogs on a stick and then tops off our fabulous get together with Smores!  My favorite part of the last get together is the lawn chairs around the campfire.  What could be better to bring a family in such close proximity?  Well, enough of my daydreaming and thoughts...onto the newest card show!

I've decided to kill two birds with one stone so I made one card for two challenges.  Generally I don't plan that far ahead.

I'm entering my furry friend in the Card Positioning challenge and The Pink Elephant challenge

Inspiration:  The card must have chevrons or hexagons for The Pink Elephant challenge.  For CPS I have to follow the below sketch.

I used two sheets from a BOK Family package.  They had some very pretty papers in this set.  I cut out a cute little squirrel from my Cricut and also 2 oak leaves.  I used just a touch of Hemp cording for a natural bow.  I used a black cardstock for the card base.  I couldn't find any stamp that fit the card.  I thought about so many options--the funniest to my hubby "I'm squirrely for your nuts" but he said I couldn't put it on the card.  So, using Word I printed out the saying "I'm nuts for you".  More appropriate to those without a sense of humor!  LOL  I had a lot of fun making this card.  It was quite nutty...or squirely-however you want to think of it!


I'm just in love with the little squirrel!  I mean how adorable is she?!?  Thanks for looking at my blog today.  Have a great weekend!  I however will be canning apple butter for my hubby! 
 
Take care, be inspired and keep on crafting!
 
xoxo
 
Ren'ee

Wednesday, September 19, 2012

Christmas Penguin Love

Today I decided to play along with Card Positioning Systems.  I really like the way this card turned out...so christmas-ey without the traditional red and greens. 

Inspiration:

My card:


Thanks for looking!
 
Ren'ee

Sunday, September 9, 2012

CPS 282-Pigs Fly

Today I made a card for my favorite hubby in the whole wide world.  He has been helping out a lot lately.  I hope he knows just how much I love and appreciate him!

Today my inspiration was from Card Positioning Systems. 

Inspiration:
and of course my it had to be a manly card.

I used a brown craft card.  The back is a wood looking scrapbook paper.  For the first time I used my sewing machine and sewed red around the wood paper.  I wanted the red to look like a handkerchief so I used my white gel pen.  Using my cricut I cut the blue circle, round circle, the pig and the wings for the pig.  I distressed the blue with white.  I distressed the white circle with brown and the Tim Holtz vintage ink.  I think it looks a lot like leather.  The pigs wings are stickled to be glittery.  I made the red tag and distressed it as well with the sentiment saying "I'll love you 'till pigs fly".  What I like the best is that the pig is on an Action Wobble so the pig can fly.


Thank you for looking at my card and have a great day!'
Ren'ee

Wednesday, September 5, 2012

CPS 281 Part 2-Card Sketch

Today I worked on creating this cute watermelon card for CPS281 Part 2 Card Sketch.  I really had to stretch my creativity with this one because I don't normally use twine or buttons for embellishments. 

My material list:
White base card 6.5 x 5"
Yellow and blue cardstock from Core'dination for card
Green, cream, red, black cardstock from Core'dination-watermelon
Preserves Cricut Cartridge
multi colored sticker from stock
Green and white twine
Yellow button
You're one in a melon stamp from My Pink Stamper
Green ink

The card sketch is:
 
Here is the card I created from the design.
 
 
I hope you've enjoyed my creation.  I can't wait to give this to a friend.  Thanks for looking and have a wonderful day!
 
 
With Love,
Ren'ee


Tuesday, September 4, 2012

Ahoy Matey

This time its for the man in my life!  I'm also entering this card in the Action Wobble challenge.  His birthday is coming up soon...shhh!  So I thought what better thing to wobble than a PIRATE SHIP!  I couldn't find a pirate ship stamp so this card has been created totally by me.

Materials:
Yellow Coredination cardstock
Two blues from the Beach theme Coredination packet
Brown Coredination cardstock from the Chocolate packet
Martha Stewart blue glitter
Tim Holtz vintage distress ink
White cardstock
Black cardstock
white gel pen
pop dots
Action Wobble
and a black think markerd

So first I took my stock 6.5 x 5" card and created an "S" card.  Playing with it I did end up cutting a little bit off of the S so that the card could stand up.  This was definetly a trial and error card...but so much fun!

I tore my two different colors of blue for the waves and attached them to the S.  I added one piece of the darker blue behind the pirate ship for depth.  The background of the card is yellow. 

This is where you have to get artsy and creative.  After looking at several different pirate ships I settled on a design...my design I might add.  I cut the brown out no bigger than what I wanted the ship to be.  I added different curves and the sterns to hold up the sails.  I cut the ship outfit and using my Spectrum Noir markers I added handrails, wood pieces and shadow.  The sails were white.  I used the pale gray markers and added dimension to them.  I cut a black sail and with my white gel pen created the skull and crossbones--that no pirate can do without.


For the Birthday sentiment I printed that on the same yellow cardstock used on the background of the card.  This time I took the Tim Holtz vintage dye and some black and just dirtied it up and made it look old.  I took toothpicks and curled the edges.


This was a little more labor intensive than just using my cricut or a stamp but I'm really pleased with the results.
 
Thanks for viewing my card.

Share some love below and have a great day Mateys!

<embarassed moment>  I just realized no where did I say that I attached the action wobble, but I did to the ship and it goes back and forth like it's at sea.  Sorry about that and big hugs everyone who has looked!

Ren'ee

Tuesday, August 28, 2012

Action Wobble Fun

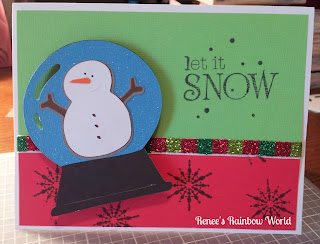
I've had these little gems on my desk for a couple of weeks now and wasn't sure how I would use them.  Action Wobbles are these little spring like devices that stick to the card and the item you want to wobble.  For my first go around I thought what better to wobble than a snowman snow globe! 
 
Materials:
green, white, black, brown, orange, glitter blue and red cardstock cut 1/4" less than base card
card (Mine is 6.5" x 5") with envelope
coordinating ribbon
Cricut Doodlecharms cartridge
2" snowman
4" snowglobe
adhesive
1 Action Wobble
 
I started by cutting the out the snowman and the snowglobe using my Cricut machine and the Doodlecharm cartridge.  With the snowman I cut the shadow, the base shape and the shift shape of the snowman.  I went ahead and cut the orange nose freehand instead of wasting more paper.  Next I cut the base of the snowglobe in black 4 inches.  Then the blue glitter paper shift snowglobe shape.  I first tried using the white glitter paper for my snowglobe but there just wasn't enough contrast between the white glitter and the white snowman.

Next I cut the green and red cardstock.  I attached my ribbon and stamped my snowflakes to the red portion and my saying to the green section.  Last but not least I attached my snowglobe to my card.

How cute is this snowman?!?
 
The Action Wobble
 
The Action Wobble wobbling!  :-) 
 
 
Thank you for stopping by...don't forget to drop a little love in the comments!!!! 
 
 
Ren'ee